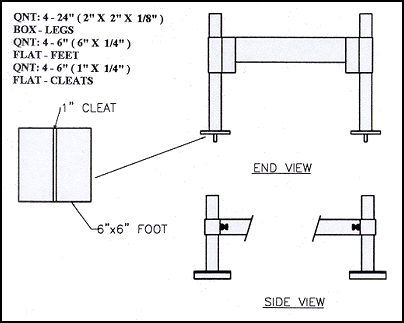
Cut 4 pieces of 6" x 1/4" flat steel 6" long for
the feet. Cut 4 pieces of 1" x 1/4" flat steel 6" long
for the ground cleats and cut 4 pieces of 2" x 2" x
1/8" box 24" long for the legs.
(Note: You may use any flat steel for feet and
ground cleats but concerning the legs - the absolute
minimum to use would be 1 1/2" x 1 1/2" x 1/8" if
you are only cutting for yourself occasionally.
The stabilizer holder would have to be sized accordingly.
See previous page. Legs do not have to fit box
perfectly, some slack is O.K.)
On the 4 pieces of 6" x 6" x 1/4" flat steel, weld
the 4 peices of 1"
x 1/4" flat steel 6" long on edge across the 6" x
6" feet on center, creating 4 pieces as in diagram.
Slide the 2" x 2" x 1/8" box 24" long into each corner
stabilizer down to the ground. Weld flat face of
the 4 - 6" x 6" feet with ground cleat to the bottom
of the 2" x 2" 24" long legs, with cleat facing down,
center feet on bottom of leg and use weight of leg
to hold to the ground. Face ground cleat across the
mill side to side. Install plate over top of all
4 legs or drill hole in base of legs to let out water.
Raise legs to full up position, then drill holes
through leg above stabilizers to install bolt for
mill transport. Some lock bolts have come loose during
transport and ripped off legs.
Warning: Do not weld feet to legs out of
the mill stabilizers. Fit legs into stabilizer holders
first, then weld feet, or you will have to lift the
mill up high to install legs.

|

